

At the end of this guide, you will have:
Follow the instructions on the Install Lamington page to install Lamington globally. Once you've done that, you're good to get started!
We'll start from an empty folder.
We need to have a package.json file so we can manage our NPM dependencies for the project. Let's create a placeholder package.json file which can be edited later if needed.
$ npm init -y
This command is a standard NPM command (which is documented here if you want more information about it).
Ok, now time to get Lamington ready to go:
$ lamington init
$ npm i
You'll see that the init command created a folder structure for you, and added lamington to the devDependencies of the project, which is why we then run npm i, so that Lamington will be around to be called from your tests later.
Now we can create our smart contract. Because of how Lamington works, this contract could actually live anywhere in the structure of the application, so if having a contracts/ folder doesn't work for you and you'd rather it live at eos/stuff/things/, don't worry, but we'll put it there for this example.
Create contracts/example.cpp as follows:
#include <eosio/eosio.hpp>
class[[eosio::contract("example")]] example : public eosio::contract
{
public:
using contract::contract;
[[eosio::action]] void dothing()
{
require_auth(_self);
eosio::print("Success!");
};
};
If you're new to EOS smart contract development, there are a few key things to note:
There are several ways to add tests for Lamington to run:
If you want to tweak this behaviour, you can ignore files using the exclude configuration value in .lamingtonrc.
So let's create a file called contracts/example.test.js:
const {
AccountManager,
ContractDeployer,
assertMissingAuthority
} = require("lamington");
describe("Example Contract", function() {
let contract;
let account1;
before(async function() {
account1 = await AccountManager.createAccount();
});
beforeEach(async function() {
contract = await ContractDeployer.deploy("contracts/example");
});
it("allows the owner to call dothing()", async function() {
await contract.dothing();
});
it("should throw when calling dothing() from another account", async function() {
await assertMissingAuthority(contract.dothing({ from: account1 }));
});
});
This is standard Mocha code, so you can use whatever you like from their docs and you can add Chai or another assertion library if you like.
So why are we running ContractDeployer.deploy("contracts/example") before every test? Since EOS doesn't let us roll back easily, this lets us run tests in a "clean" environment, which means a fresh copy of the contract is deployed for every single test.
Still with me? Great! Let's run those tests:
$ lamington test
If you haven't run Lamington before, it's now going to build a Docker image for you, (which takes a few minutes) then it will run the tests you just created. You should see that the tests pass!
Ok, so what if we want to use TypeScript? That's easy, we only need to do a few things:
$ npm i --save-dev @types/mocha
{
"compilerOptions": {
"target": "es5",
"module": "commonjs",
"strict": true,
"noImplicitAny": true,
"lib": ["es6", "es2015", "dom"]
},
"exclude": ["node_modules"]
}
import {
Account,
AccountManager,
ContractDeployer,
assertMissingAuthority
} from "lamington";
import { Example } from "./example";
describe("Example Contract", function() {
let contract: Example;
let account1: Account;
before(async function() {
account1 = await AccountManager.createAccount();
});
beforeEach(async function() {
contract = await ContractDeployer.deploy("contracts/example");
});
it("allows the owner to call dothing()", async function() {
await contract.dothing();
});
it("should throw when calling dothing() from another account", async function() {
await assertMissingAuthority(contract.dothing({ from: account1 }));
});
});
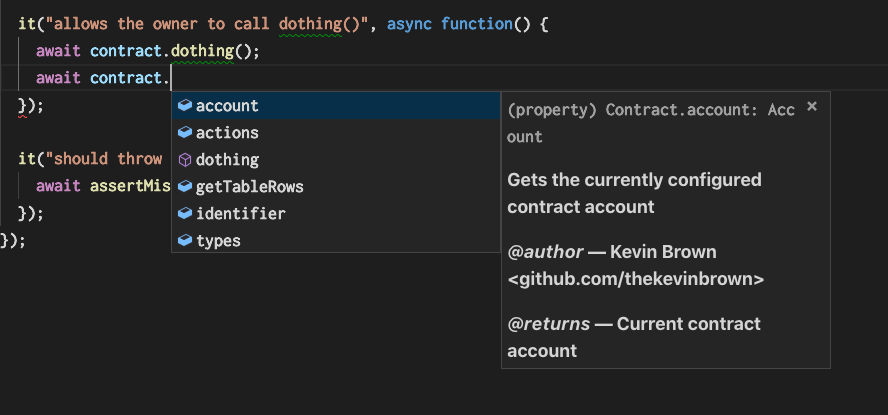
Now you have full autocomplete in VSCode when you call actions on your contracts, and your tests are type safe!
By now you've likely realised some of the things that Lamington can do for you:
I hope you've found this helpful. We're always keen to talk to new EOS devs, so please feel free to join our Slack below!